I found a sketch by Lisa E Designs (lisae-design.blogspot.com) and made a layout using it. I have included both the sketch and my layout.


The paper is MME Cut & Paste "Flair" collection. I can't remember where I got it but I got a kit that had the paper, cut-a-parts, stickers, tiny word stickers, and ribbon. The ribbon that came in then kit was MME Stella Rose. The stickers for the title came from my stash and the pink glitter rose I made awhile ago and the white leaves were something I got off of www.listia.com. Not sure the brand on them, they just said fashion flowers & accessories.
The layout is of my daughter being checked out by the doctor after she ran into the wall while doing the backstroke in swim team practice. Luckily it wasn't broken but it was jammed and very badly sprained. So, unfortunately she was out for the next two swim meets. The elbow is now fine and she will be back to swim next season.


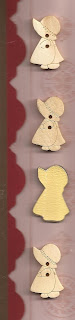
 This is a layout I did for my first S.H.O.P (stash horded on pages). I wanted to start using those things in my stash of scrapbooking supplies that I have been hording. I have a bad habit of thinking, "If I use this here, I won't have it for later." How silly is that? So I am on a mission to use up my stash and especially those horded items before allowing myself to buy more. To that end, I used the Creative Imaginations Awkward Family Photos paper and a couple of the stickers, some yellow enamel dots, alpha stickers that I have had so long I have no idea what company they were from, and three wooden precious moments type buttons (the poem called for four young ladies standing in a row so I made a 4th from my Silhouette Cameo. I cut the image 8 times and glued them all on top of each other to give the same thickness as the buttons.)
.jpg)

.jpg)